The crucial digital Graduated Filter or Adjustment Brush tool can optimize dark and bright tones in selected areas of any digital image file (JPEG, raw, TIF). Adobe Lightroom software (or Google’s free Snapseed app for iOS, MacOS, Android, Windows) adjusts photos easily. Adobe Photoshop takes more effort to accomplish the same thing.
Your eyes see deeply into shadows and highlights which most cameras unfortunately render too dark or bright by default. Many cameras made after 2008 can alleviate common contrast problems in JPEG shots if you know how turn ON their special mode for highlight, shadow, contrast, or dynamic range (named differently by brand):
- Canon: i-Contrast and Highlight Tone Priority
- Nikon: Active D-Lighting is great for JPEG, but can slow down shooting performance. When shooting raw, turn off Active D-Lighting.
- Fujifilm: DR, and D-Range priority
- OM System (formerly Olympus, before 2022): Shadow Adjustment Technology (SAT)
- Sony: Dynamic Range Optimizer (DRO)
I applaud the above advances in camera contrast control, which most JPEG photographers should leave ON. Film never gave you so much contrast control.
But you’ll control tones much better by shooting raw file format and adjusting specific areas of the image as needed, using Adobe Lightroom‘s digital Graduated Filter or Adjustment Brush as explained in Parts I and II below.
When you shoot landscape images on JPEG or film, a glass neutral-density graduated filter is often required to balance bright sky with dark foreground. Raw files now digitally replace the glass graduated filter. Compared to JPEG shots, raw files have at least 16 times the color depth per pixel and expand recoverable dynamic range by 2 to 3 stops in APS-C sensor cameras, like magic (or by only half a stop using small sensors, such as in a 2008 Olympus E-30 camera with Micro Four Thirds sensor.)
If your camera shoots raw files, adjust tones manually in your raw converter software such as: Adobe Lightroom, Adobe Photoshop, free FastStone.org editor, or raw file software provided on your camera’s CD/DVD. Lightroom has revolutionized my photo workflow speed and organization. Learning is best “hands on.” Download a free trial copy of Lightroom from Adobe.com. Then Import your own landscape image with sky and dark foreground, and play with the steps below. Learn Lightroom within a few days. Students, teachers, and school staff can get cheap academic discount through Adobe.
Part I: Adobe Lightroom: great Graduated Filter and Adjustment Brush
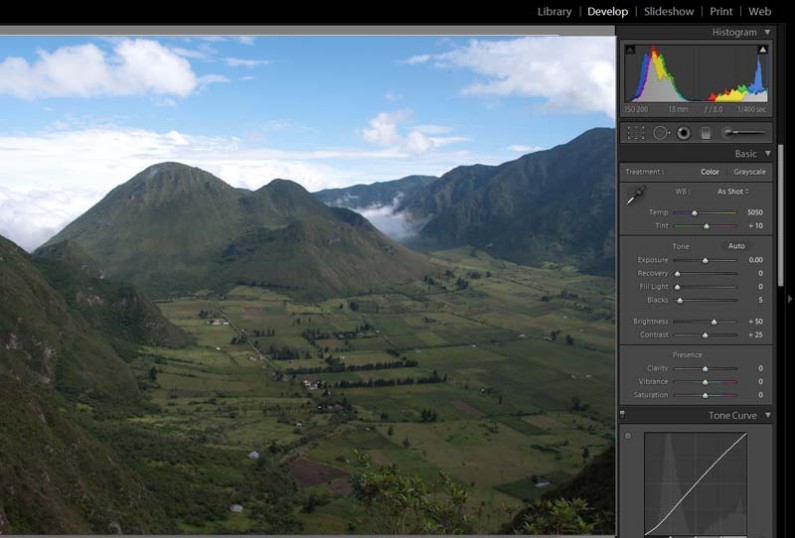
The following three Figures illustrate how to adjust image tone and apply a digital Graduated Filter or Adjustment Brush in Adobe Lightroom (this illustration from version 2.3 also resembles future versions). Other photo editing programs can do some of this, but Lightroom boasts tools which are better, quicker, and nondestructive, with Undo to any step of the photo’s edit History database.
Figure 1: Original image
Figure 1 shows the original image as shot and saved in raw file format (Nikon .NEF file with 12-bit color depth per pixel). Notice the colorful histogram in the upper right of the Develop module of Adobe Lightroom version 2.x. The histogram data piles up against the far right, indicating that the whitest and brightest areas of the image are overexposed and truncated. Luckily on 2009 DSLR cameras, raw files let you recover 1-2 stops of overexposure (and up to a stop of shadows).

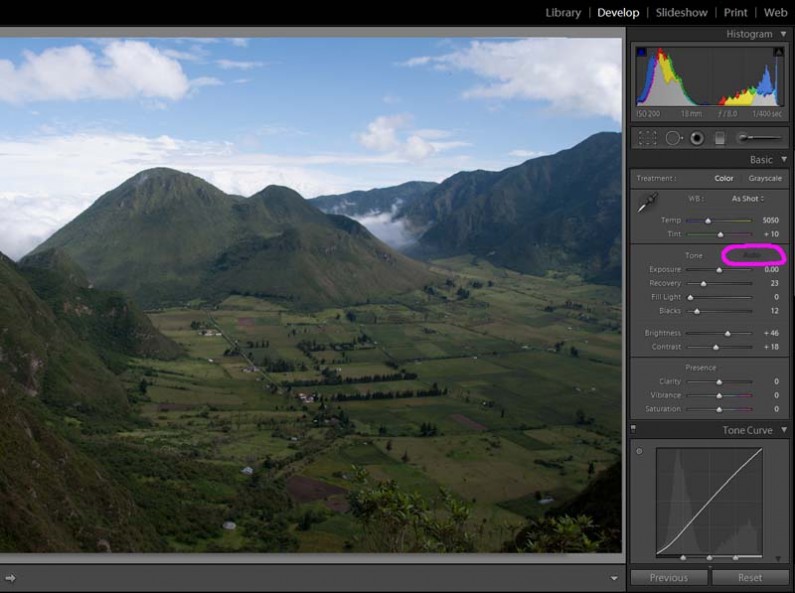
Figure 2: press Auto Tone button or adjust each tone slider
Click the Auto Tone button (circled in pink in Figure 2 below) for a quick fix. Auto Tone automatically adjusts the sliders for Exposure, Recovery, Blacks, Brightness and Contrast.
If you don’t like the automatic result of Auto Tone, choose Edit>Undo (or CTRL+Z in Microsoft Windows) (or Reset All for that image in the Library module), then adjust sliders individually. To be more precise, move the Exposure slider leftwards (to darken) and/or the Recovery slider rightwards to recover the data in the overexposed areas (which would have been irrecoverably truncated if shot as JPEG). In this image, increasing Recovery to 23 and decreasing Contrast to 18 recovered all of the truncated highlight data. Also, blacks were darkened from 5 to 12. Mid tone Brightness was shifted darker (from 50 to 46).
Compare Figure 2 (above) with Figure 3 (below) to absorb the gist of this article without needing to read everything.

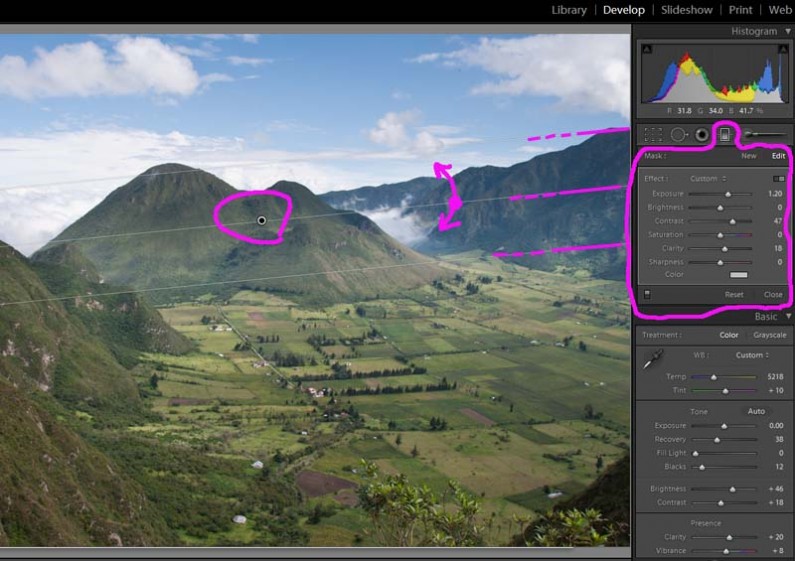
Figure 3: draw the Graduated Filter and adjust its tonal sliders
Click the Graduated Filter tool icon just below the histogram (shown boxed in pink), or press G. A box will drop down a set of six sliders as shown (or buttons). Toggle between slider mode (much preferred) and +/- button mode by clicking the light/dark pair of squares just below the word “Edit.”
Drag to draw the transition area of the Graduated Filter onto the image. Where you first click the mouse is zero effect, and the point where you release the mouse button after dragging is 100% filter effect. Three parallel hairlines appear on the image showing the starting, middle, and stopping points from your mouse drag.
Hovering the mouse over the middle hairline (away from the center dot) turns it into a curved double headed arrow which allows grabbing and rotating the Graduated Filter, to align with the mountain horizon. To shrink or enlarge the transition area of the Graduated Filter, grab the top or bottom hairline and drag. You can grab and drag the middle line’s center dot (circled in pink) to move the whole filter.
You can add multiple Filters to the image (just like Layers in Photoshop but easier). To modify settings of each filter, you must first select the center dot which turns black (indicating selected/active). Delete key will remove a selected filter. The filter’s center dots only appear when the mouse hovers over the image area, and disappear when hovering outside. Warning: pressing H once by mistake toggles the appearance, or confusing disappearance, of the dots marking locations of Graduated Filters; press H again to restore appearance.
If the straight line of the Graduated Filter tool doesn’t line up correctly with parts of image, instead use the more flexible Adjustment Brush, which looks like a paintbrush and can draw your “filter” (mask) to any shape! Use the mouse scroll wheel (if any) to quickly change the brush size. To erase previously Brushed areas, hold down the ALT key while drawing, which makes the circular cursor label change from + (plus) to – (minus). To see a red mask indicating the affected area that you drew for the Adjustment Brush, hover the mouse pointer over over its active black (selected) dot, or toggle with the O key.
Part II: How to apply a digital graduated filter in Adobe Photoshop or other software
Cut your editing time by more than half by using Adobe Lightroom as above, instead of Adobe Photoshop. No need to read onwards.
Do you need even more control? Layers and Adjustment Layers in Adobe Photoshop (CS, CS2, CS3, CS4, CS5) can also create a digital graduated filter or adjust with very precise Selections.
A “digital graduated filter” or “neutral-density graduated mask” can revive most landscape images using Adobe Photoshop or Lightroom:
-
- We want to capture images which accurately portray the tone of what we saw and felt.
- Unfortunately, most cameras poorly capture the total range of light from bright to dark in a sunlit subject that includes shadows. In comparison, your eyes can quickly perceive subjects in dark shadows in great detail simultaneously with brightly lit areas.
- As a workaround, use a “digital graduated filter” or “neutral-density graduated mask” to separately optimize the areas of shadows and highlights. Separately optimize the sky and foreground of a landscape image. First, digitally select the dark foreground (all except the sky) of the image. Then adjust its white point, mid tone level, black point, color saturation and Clarity (local contrast). Then digitally select the bright sky and optimize with different filter settings. Each distinctive tonal area of the image should be adjusted separately. The term “mask” refers to the part of the image which is excluded from the filter settings.
- Shooting raw files is much better than shooting JPEG if you plan to optimize/edit the image.
- Always properly expose the highlights at at shooting time. Make sure the shot is well-exposed by maximizing the area under the bell-curve of the histogram. The camera’s handy histogram displays brightness values from 0 to 255 from left to right. Expose brightly enough to push the histogram curve as far right as possible, making sure that it flattens to zero at brightness value 255 (far right edge), without truncated data climbing up the right side. Overexposed JPEG files cannot recover highlight detail. Any subject that is overexposed (brighter than 255) in a JPEG file will be truncated at brightness level 255, losing highlights.
- Thankfully, raw file converter software can recover an additional f-stop or two of highlight information brighter than 255 from DSLR raw files (or about half a stop for compact, small-sensor camera raw files) and rebuild the smooth histogram 0 to 255 using image data from improved dynamic range. You can also recover a similar amount of tonal information in the shadows/blacks while controlling mottling noise!
- Do all your tonal editing in raw files (or 16-bit TIF files exported from raw) in order to avoid posterization. You can revive many JPEG shots, but in big enlargements, the quality can be noticeably worse than when derived from raw and 16-bit TIF.
- Do as much of your editing as possible on the raw file itself using raw file converter software. For further editing such as to make more accurate prints, output a 16-bit TIF file. Or edit JPEG files if that’s all you shot, but if the edited image looks pasty or posterized, undo and reduce how far you changed tonal sliders.
- On your computer, run any photo editing software that supports tonal changes on selections, layers, adjustment brushes, or graduated filters. Open the raw, TIF or JPG file. To avoid compression losses each time you save a JPG file, save the original JPG image file as a non-lossy TIF, and edit just the TIF, preferable with 16-bit color depth.
- Shadows (or foreground) adjustment: Select just the shadows plus non-sky mid tones, excluding the sky:
- Using Adobe Lightroom 2: Lightroom is much quicker and easier than Adobe Photoshop while achieving similar excellent results (except Photoshop is better for preparing images for printing sRGB format or for pre-press CMYK work).
- Under the Develop tab, select the shadows plus non-sky mid tones (excluding the sky) in the image by dragging/drawing a Graduated Filter (and tilt as needed) or a very large Adjustment Brush.
- Then adjust Exposure (shifts the whole histogram brighter or darker), Brightness (shifts just the mid tones, keeping the brightest and darkest values constant), Contrast (widens or compresses histogram), Saturation (intensifies color purity), and Clarity (increases local contrast to better define large edges and shapes; very useful on almost every shot!).
- In the same way, select and adjust the highlights (bright areas such as the sky) in the image by dragging/drawing another Graduated Filter or very large Adjustment Brush.
- Under the Develop tab, select the shadows plus non-sky mid tones (excluding the sky) in the image by dragging/drawing a Graduated Filter (and tilt as needed) or a very large Adjustment Brush.
- Or using Adobe Photoshop:
- Create a Levels Layer (Layer>New Adjustment Layer>Levels…). On this new Levels Layer, draw a black mask over the sky using the Gradient tool. Or click the Quick Mask button, and draw using the Brush Tool (set to a very big soft-edged Airbrush with color reset to black).
- Slide the white value end-point slider (“256” level) to the leftwards in the Levels 1 histogram until you almost start cutting off the right edge of the bell curve. This sets the white point and lightens your shadow selection.
- Adjust the mid tone slider in the Levels 1 histogram, making the image darker or lighter as needed to match what your eyes saw in reality. Don’t overdo. Go back and readjust, as each setting affects the others. (Often an additional Curves Layer will do a better job of balancing mid tones.)
- Slide the black value end-point slider (zero “0” level) to the right in the Levels 1 histogram until you start cutting off the left edge of the bell curve, or as needed to match what your eyes saw in reality.
- Readjust the black point, mid tone and white point sliders as needed, because their interaction changes image appearance. Don’t overdo. If the edited image looks pasty or posterized, Undo or go back in History and reduce how far you changed tonal sliders.
- Using Adobe Lightroom 2: Lightroom is much quicker and easier than Adobe Photoshop while achieving similar excellent results (except Photoshop is better for preparing images for printing sRGB format or for pre-press CMYK work).
- Highlights (or sky) adjustment:
- using Adobe Lightroom 2: use same technique as step 5 for shadows above.
- using Adobe Photoshop:
- Invert the above shadows/mid tones selection to make a new Levels Layer for the highlights selection, as follows in Adobe Photoshop: Select>Load Selection>”Channel: Levels 1 Mask”. Then choose Select>Inverse. Then choose Layer>New Adjustment Layer>Levels…. This makes Levels 2, for the highlights.
- Move the black value end-point slider (zero “0” level) to the right in the Levels 2 histogram until you start cutting off the left edge of the bell curve. This sets the black point and darkens the highlights.
- Adjust the mid tone slider darker or lighter as needed to match what your eyes saw in reality. Be careful to keep the sky/highlights looking natural. Beware of adjusting the white value end-point slider “256” level) for the highlight selection (Levels 2). If the edited image looks pasty or posterized, Undo or go back in History and reduce how far you changed tonal sliders.
- Your photographs will now have more emotional impact like you perceived in the field.
- We want to capture images which accurately portray the tone of what we saw and felt.
