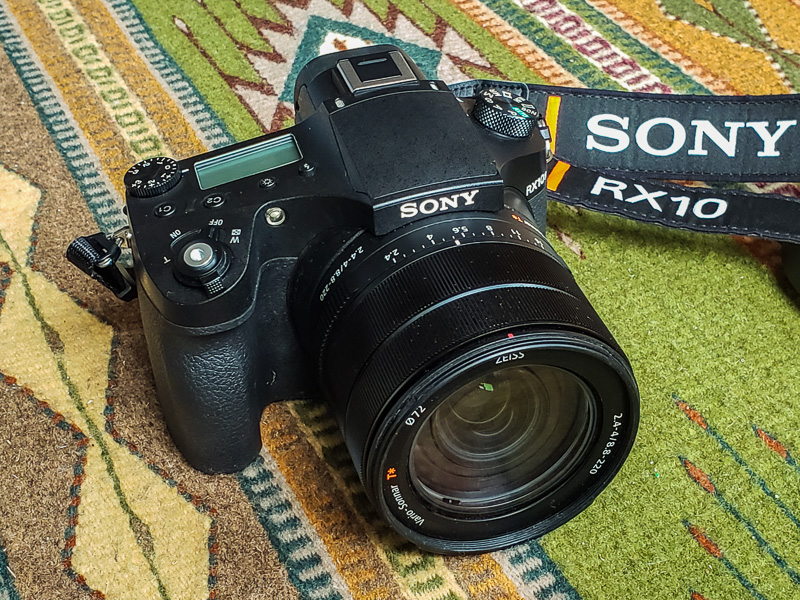
From 2018–2025, Sony RX10 version IV (RX10M4) reigned as the world’s best travel camera, with bright 25x zoom f/2.4-4 lens, remarkably sharp from edge-to-edge from 24-600mm equivalent. Until Sony discontinued the RX10M4 in March 2025, this all-in-one marvel was my top pick for portable wildlife telephoto. Unprecedented versatility with publishable image quality made Sony RX10M4 and RX10M3 my main travel cameras from 2016 through June 2025. Then I upgraded to the full-frame-sensor Sony A7CR camera mounted with 8x Tamron zoom.
UPDATE: Sony upgraded RX10M4 to RX10M5 for release in August 2026, with faster autofocus, 50% longer battery life, superior video, sharper LCD, and no built-in flash.
In comparison to the RX10, Tom rates the world’s best travel system to be the Sony A7CR camera (2023, 18.2 oz body, 60-MP BSI CMOS full-frame-sensor) mounted with its sharpest travel lens, the 8x optical zoom Tamron 25-200mm F2.8-5.6 Di III VXD G2 for Sony E-mount (2025, 20.3 oz) — 38.5 ounces total including body, lens, battery, and memory card (or 41 ounces when you add the strap, LCD cover, lens filter, lens cap, and hood, making it 2 ounces lighter than Sony RX10M4). My handheld field testing shows the A7CR system to be sharper than Sony RX10M4 from 28mm to 450mm equivalent (a 16x zoom range). The two systems become equally sharp where Tamron images shot at 200mm are digitally cropped to about 460mm equivalent on the 20-megapixel RX10M4. Cropping this 200mm 60-MP A7CR system down to the sharpest central 6.7 MP (one ninth), or 600mm equivalent, resembles 10 MP shot on the RX10M4 — sufficient for publications.
Sony Cyber-shot DSC-RX10 version IV (Amazon) happily upgraded my version III camera with improved autofocus, menu reorganization, and touchscreen autofocus. This article reviews the RX10M4, reveals hidden settings, suggests accessories and compares with rivals. CIPA battery life is a respectable 400 shots per charge. See our trips to southwest USA and Canada shot on RX10M4.
Detailed Review of Sony RX10M4
RX10M4 firmware update 2.00 adds Real-Time Animal Eye AF and improves camera stability
Check your firmware version number using the MENU button > SETUP6 > Version. If you have version 1.00 like I did, be sure to Download the latest Sony RX10 IV Firmware Update 2.00 (released by Sony Support on 14 November 2019). The 2.00 update adds Real-Time Animal Eye AF; enables the possibility to operate the real-time EYE AF by half-pressing the shutter button; and improves the overall stability of the camera. But to make the new Animal Eye AF feature work with Half Press of the shutter button, you must toggle: MENU1 > Page 6 > Face/Eye AF Set > Subject Detection > set to [Animal] or set to [Human] (default). To find it easier in the future, use Add Item to put “Face/Eye AF Set” onto Tab 6 > STAR menu (My Menu1). Read more at helpguide.sony.net.
Telephoto quality
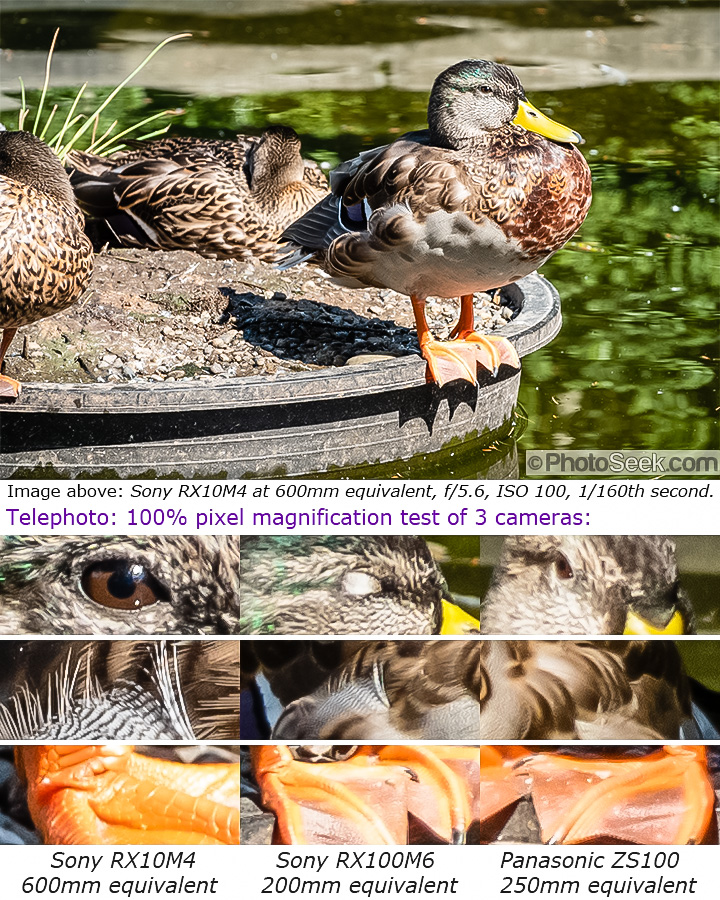
Let’s talk tele first — the main reason to have this substantial 39-ounce camera. The duck and flamingo examples below show how wonderfully sharp is RX10M4’s 600mm telephoto for wildlife, hand-held with SteadyShot ON, sharpest at f/5.6. If a 39-ounce RX10M4 seems too big, consider the pocketable 11-ounce Sony RX100M6 which has the same sensor and nearly equal image quality up to 200mm equivalent. Or a pocketable Panasonic ZS100 costs half as much as RX100M6, is nearly as sharp, and reaches to 250mm. In this duck example, compare 200mm and 250mm from two pocket cameras versus 600mm from RX10M4 to see how much detail is sacrificed:
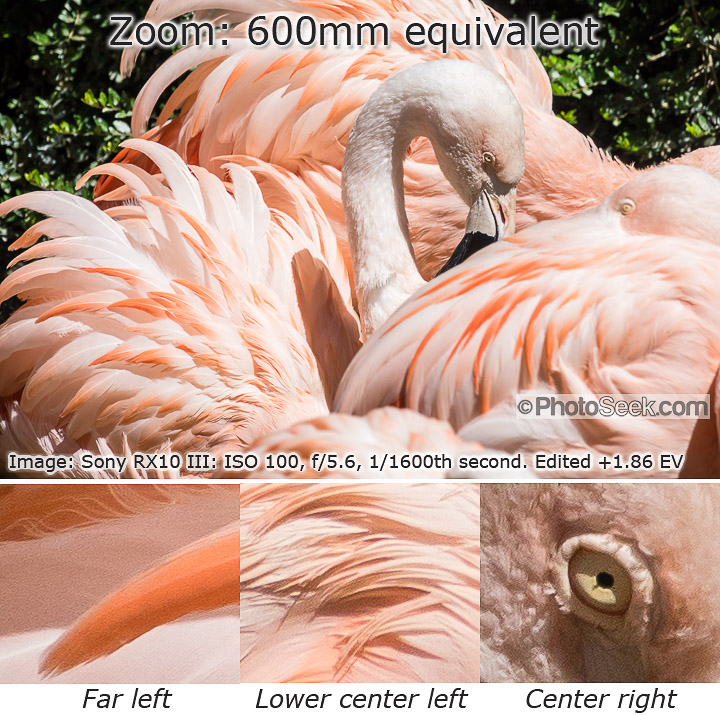
Three extracts from this Chilean Flamingo image show the crisp 600mm-equivalent telephoto reach of Sony RX10M3 (same lens as RX10M4):
Telephoto tips for RX10M4
- Sony RX10 IV and III are sharpest across the frame at all zoom settings when using the optimally crisp apertures of f/4 from 24-400mm equivalent and f/5.6 from 500-600mm. If you need more light to maintain sufficiently fast shutter speed while keeping ISO low, the zoom’s variable aperture is brightest at f/2.4 at 24mm and falls to f/4 at 100-600mm equivalent. Although you can get an interesting starburst effect from the sun or pinpoints of light when shot at f/16 on RX10 IV and III, apertures f/8—f/16 should generally be avoided on 1-inch-sensor cameras due to fuzzy diffraction across the entire image frame, worst at f/16, cutting resolution in half.
- For sharper hand-held shots at 600mm maximum telephoto, use 1/100th second shutter speed or faster, with Image Stabilization ON (or much faster for moving subjects such as sports or birds).
- Zoom Assist: The big button on the base of the lens is Focus Hold by default. In order to more easily locate birds or small subjects at 500-600mm telephoto, to see outside of that narrow angle of view, reassign the Focus Hold button (or another button) to Zoom Assist as follows: press MENU > Camera Settings Tab 2 > List #9 > Custom Key(Shoot.) > page 2 > Focus Hold Button > [Zoom Assist]. While held down, Zoom Assist quickly widens the angle of view to allow re-centering upon a bird, so you can pan to follow the bird’s motion, then release Zoom Assist to restore your original narrow angle of view.
- You can increase zoom racking speed from 24 to 600mm in just 2 seconds, by setting Zoom Speed = “Fast“ in MENU > Settings Tab 2 > List #6. I mostly use the default 4-second “Normal” for finer framing control, except where fleeting wildlife or sports require “Fast“. The Zoom Speeds of Fast and Normal apply to still shots; but Movie recording mode thankfully automatically invokes a slower, virtually silent zoom to avoid jarring video viewers. RX10’s power zoom being locked on track at all settings avoids the annoying zoom creep (slippage when pointed up or down) behavior of most 11x-19x manual (non-power) zooms made by Sony, Nikon, Tamron and others for APS-C cameras. The short 2 or 4 seconds to rack through RX10M4’s incredible 25x zoom beats the longer inconvenience of changing lenses on interchangeable lens systems such as APS-C or full frame, which I formerly used 1978-2015.
Close-focus enlargement / macro
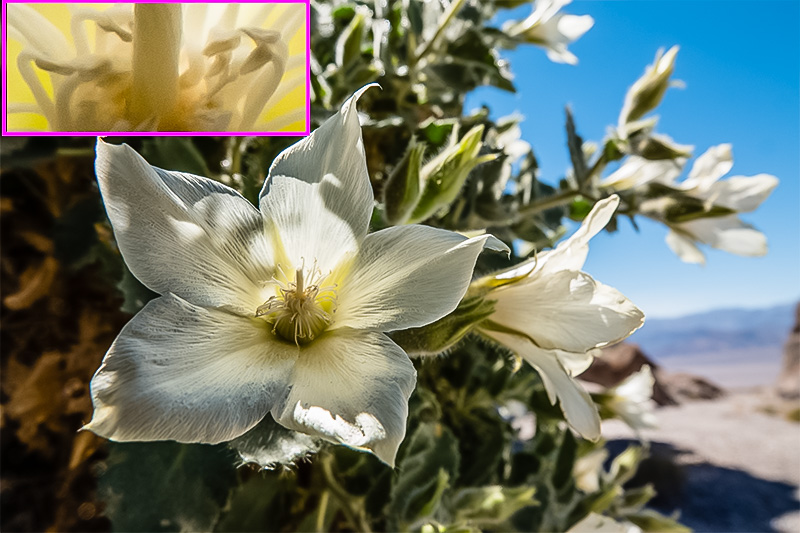
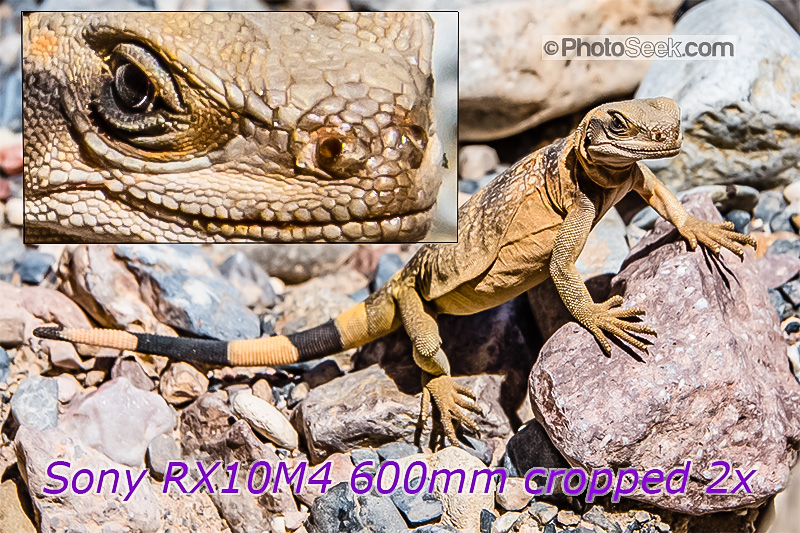
is another compelling reason to own the Sony RX10M4. Examine how the flower looks at 24mm and lizard at 600mm equivalent:
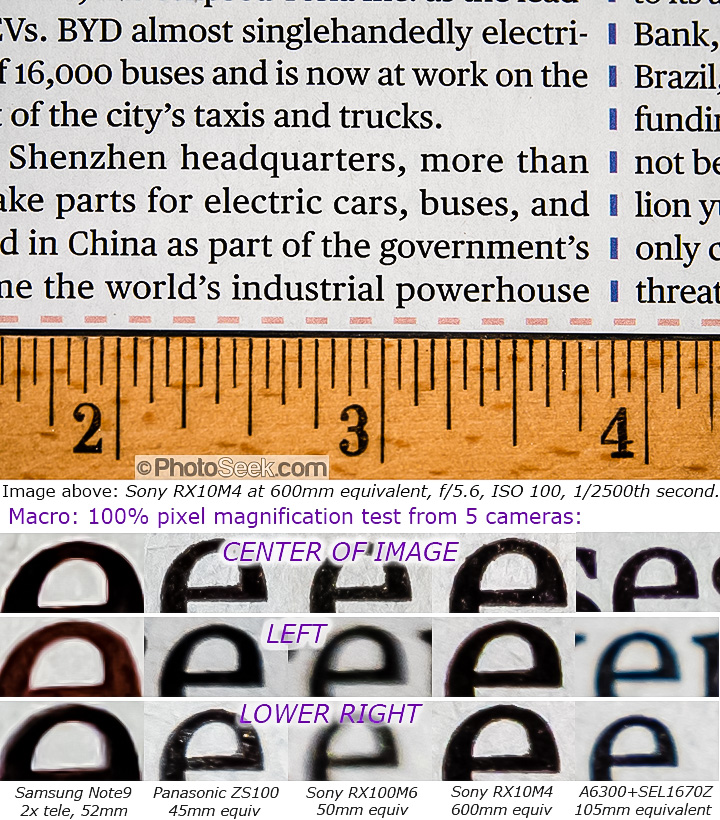
Below, I test the close focus (macro) capability of five top travel cameras, to report their biggest magnification of a letter “e” printed on paper:
Three top travel cameras with excellent macro
- Best of the bunch, Sony RX10M4 / RX10M3 captures superb insect and flower macro at 600mm equivalent at f/5.6, with sharp rectilinear results, zero distortion, and tightest magnification of subjects down to 2.7 inches wide. At 600mm, RX10M4’s 28-inch closest working distance from the front of the lens avoids shadowing the focused subject and helpfully leaves undisturbed such flighty subjects as butterflies or lizards.
- RX10M4 can capture excellent macro at 400-600mm f/5.6, though subject magnification declines to 3.2″ wide at 550mm, 3.8″ wide at 450mm, and 4.2″ wide at 400mm.
- RX10M4’s macro can be fun and useful at 24mm, sharp in center but may be heavily shadowed at closest focus 1.2″ from the front of the lens, heavily warped with barrel distortion, and fuzzy at edges. Despite technical lens imperfections at 24mm, my intimate close focus shot of the desert rock nettle photo above looks fine, no problem. Emotional impact is more important than perfection.
- Much more rectilinear than 24mm is 65-90mm macro of subjects as tight as 3 to 4+ inches wide, at f/4 — sharp at center but with soft edges and some barrel distortion. But Panasonic ZS100 at 45mm equivalent enlarges much more sharply and rectilinearly than RX10M4 at 70mm or 24mm.
- Surprise: at middle focal lengths 110-380mm equivalent, minimum working distance from the front of RX10M4’s lens jumps — to 55″ at 250mm, which drastically widens the tightest magnification of subjects to 10+ inches wide.
- Fitting handily into a shirt pocket, Panasonic ZS100 enlarges best at 45mm equivalent. This optimum setting is very sharp and rectilinear from edge-to-edge, although the subject must be very close to the front of the lens, sometimes overshadowed. At 25mm, f/5.9 is sharper than f/3.5, but edges are still much too soft. For optimal close focus, zoom to 45mm equivalent and don’t forget to press the Flower Button (Macro, Left Arrow).
- Samsung Galaxy Note9 or S9+ smartphone enlarges surprisingly well at “2x tele” f/2.4 with deep depth of focus, using a second dedicated back camera with 52mm equivalent lens.
Two cameras with poor macro
- Significantly worse quality comes at close focus using a pricey SEL1670Z lens on Sony A6300, even at its best 105mm enlargement at f/5.6. As with most APS-C camera lenses, it focuses better on subjects from 2+ feet to infinity. Due to the physics of their larger sensors, APS-C cameras require specialty lenses for decent macro. But that macro lens money would be better spent on a good Panasonic ZS100 pocket camera, or paid towards the superb Sony RX10M4.
- Although it can focus quite sharply at subject distances further than 12 inches from the lens (sharper than ZS100), Sony RX100M6/VI captures very poor quality at macro, such as its tightest enlargement at 50mm equivalent zoom. As a workaround to achieve superior macro, try earlier Sony sibling cameras RX100M5, RX100M4 or RX100M3; or Panasonic ZS100 at 45mm close focus; or Sony RX10M4 or RX10M3; or a good smartphone with 2x tele second back camera, as in Samsung Galaxy Note9.
Editing raw profoundly beats JPEG
High dynamic range is retrievable from well-exposed raw-format image files, with plenty of leeway to brighten shadows in the following Grand Canyon image shot at wide angle:

I strongly prefer shooting raw format, because JPEG format severely limits tonal editing. The foreground branches in the above image would have been irrecoverably dull if shot JPEG-only. Raw images can be best rendered back to my original perception using Adobe Lightroom Classic (LRC) or LR software on a PC.
Tip: To optimize signal-to-noise ratio at shooting time, I shoot near base ISO 100 or 200 and expose highlights of the Histogram curve to the far right (to the bright side), while avoiding truncation or Highlight Warning (or Zebra). If underexposure occurs unintentionally, thankfully RX10M4’s base ISO (100 or 200) raw images can be brightened in Lightroom to have almost the same amount of noise as if shot at higher ISO 1600. This advantage is called ISO invariance, found in raw files of RX10M4, RX10M3, RX100M6 and RX100M5.
HDR (High Dynamic Range) software can now combine multiple raw shots, for Night Photos
HDR techniques combine multiple shots to increase detail, improve dynamic range, and lower noise levels, as done in the latest top smartphones (to compensate for their tiny cameras).
New in 2018, we can now combine multiple raw files with the free Kandao Raw+ tool, as described in dpreview.com. This is a great leap forward for night photography! No tripod is necessary. Simply stand in one place and capture a fast burst of 8 to 16 overlapped raw frames. Expose the Histogram curve to the right as usual. Don’t worry about exposure bracketing or subjects in motion. As a master reference, pick one frame, then import up to 16 overlapped frames into the program to create a single DNG file, which can be further edited in Lightroom. The software magically recreates the scene with improved dynamic range like your eyes see. The technique can theoretically recovery brightness detail of up to four Exposure Values greater than would be contained in a single raw file.
TIP: Bright Monitoring is a welcome new feature for night photographers, when subjects are otherwise too dark to see in the viewfinder/monitor. In PASM modes only, a Bright Monitoring toggle brightens the viewfinder/monitor to better see the composition, without affecting exposure compensation. I assigned it to Custom Button 2 (C2 on top of the camera):
- MENU > Tab 2 > List #9 > Custom Key(Shoot.) > Custom Button 2 > [Bright Monitoring]
- It only works with Manual Focus (MF on focus mode dial), and not with MF Assist or Focus Magnifier. It may slow shutter speed response.
- Bright Monitoring continues after shooting, until you toggle its button or turn off the camera.
JPEG-only option: multi-shot HDR (High Dynamic Range)
Instead of shooting raw, most people like to shoot the default JPEG file format, which conveniently requires no editing step. Out-of-camera JPEGs are looking better than ever, especially from top smartphones, which have greater processing power than larger cameras. But JPEGs can still benefit from artistic editing to appear more like your eyes see. To brighten shadows with less noise, try shooting HDR:
If you shoot JPEG-only (Quality = Extra fine, Fine or Standard), for high-contrast subjects, try the High Dynamic Range (HDR) “Exposure Diff. Auto” feature, where the camera makes three exposures which are merged in-camera into a single JPEG file:
- MENU > Tab 1 > List #10 >DRO/Auto HDR > [Auto HDR: Exposure Diff. Auto] or else [1.0EV – 6.0EV] lets you pick HDR strength as a fixed Exposure Value difference.
- Choosing Auto is more practical than picking a fixed EV difference 1.0EV – 6.0EV.
- Use only when the subject is motionless and lighting is constant.
- It just works for picture Quality=JPEG-only. (“HDR AUTO” menu is grayed-out and unavailable if Quality=”RAW+JPG” or “RAW”).
Shooting JPEG automatically uses DRO (Dynamic Range Optimizer)
If you shoot JPEG files, Sony thankfully invokes automatic Dynamic Range Optimization (DRO) by default. This brightens shadow details while preserving highlights, somewhat like your eyes see. More details:
- MENU > Tab 1 > List #10 >DRO/Auto HDR > [D-Range Optimizer Auto] is a great default, or else manually pick [Lev1 to strongest Lev5].
- These DRO settings create tags which affect raw file appearance in Sony raw conversion software, but are ignored in Adobe Lightroom (which is fine, as I prefer my own raw shadow-editing choices).
- D-Range Optimizer Auto works if picture Quality is set to RAW+JPEG or JPEG-only (Extra fine, Fine or Standard).
- If shadows still appear overly dark, try editing the JPEG, shooting HDR (several shots combined), or editing raw.
Dim light photography using SteadyShot and Hand-held Twilight mode
Impressively, Sony claims SteadyShot image stabilization of up to 4.5 stops of benefit for slower shutter speed hand-held, especially at telephoto angles of view. Sony SteadyShot sharpens my hand-held shots so well that I rarely use a tripod anymore. Unleashing your camera from a tripod releases inner creativity.
For dim light, Hand-held Twilight mode works great in caves, indoors, or night scenes. Introduced in 2010 Cyber-shot cameras, this innovative JPEG-only Scene/SCN mode combines a burst of shots to reduce subject blur, camera-shake, and noise. Hand-held Twilight mode has served well in my Sony NEX-7, RX100M3, RX10M3, and current RX100M6 and RX10M4 cameras.
Also melding a burst of shots, Anti Motion Blur uses a higher shutter speed (via noisier higher ISO) to help freeze subject motion indoors. Set with: MODE DIAL > SCN > Control Dial (adjacent to MOVIE button) > [Anti Motion Blur] or [Hand-held Twilight mode]

50mm lens test in dim indoor light
Below, five cameras tested with 50mm equivalent lenses in dim indoor light are compared at 100% pixel magnification. All were shot in raw format and optimized similarly in Lightroom.
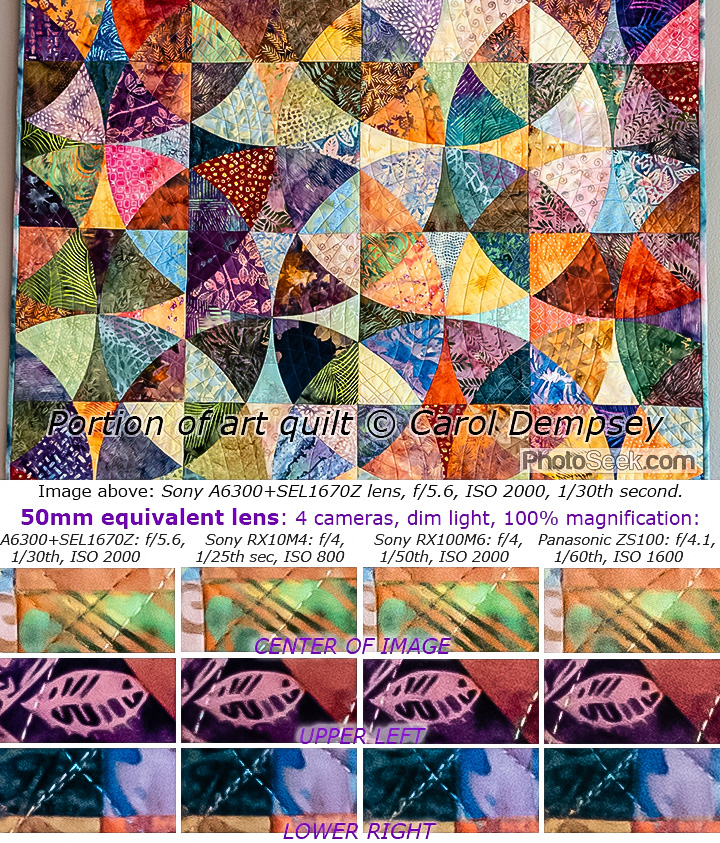
Results: Best image quality at 50mm equivalent in dim light is captured in the following order:
- The 4x zoom SEL1670Z lens on Sony A6300 does best.
- The 25x zoom Sony RX10M4 looks almost as good.
- The 8x zoom Sony RX100M6/VI has only slightly more noise than RX10M4, which could be fixed by shooting at ISO 800 instead of 2000.
- The 10x zoom Panasonic ZS100, cheapest of the four, places last. Despite its noisier, lower-contrast results, ZS100 still captures decent quality, for less than half the price of the other three cameras.
Evocative images can be created with any camera. For travel, I recommend any of these good-quality zooms having at least 8x range for greater compositional flexibility.
Recommended accessories for Sony RX10 IV or III (Amazon links)
- Sony PCK-LM15 Semi Hard Protective LCD Cover preserves resale value. (Avoid JJC brand LCP-RX100 which creates an unsightly bubble in contact with the LCD.)
- Wasabi Power NP-FW50 (1300mAh) batteries for Sony extend shooting time on the go.
- SanDisk Extreme PRO 128GB UHS-I/U3 SDXC Flash Memory Card (Amazon) fits weeks of shooting.
- B+W 72mm XS-Pro Clear MRC-Nano 007M Filter protects lens from scratches & catastrophic drops.
Carry the 2.5-pound Sony RX10M4 in a bag or on a holster:
- Lowepro Photo Active TLZ 45 AW toploader bag fits perfectly. Organizing pockets on inner lid and outer side (fits four batteries). Tom unclips the “Removable Shoulder Strap” and carries this bag on the trail with a separate Ortlieb chest harness.
- Spider Holster – Spider X Backpacker Kit – “Self Locking, quick draw access to your camera on the go from any belt or backpack strap!”…“Spider X Belt and Backpack Camera Holster Kit with Clip-On Self-Locking Camera Holster, Mirrorless Camera Plate, and Backpack Adapter – Compatible with Any Belt or Bag Strap”.
Focus and exposure tips for RX10M4 / RX10 IV
- Sony’s RX10M4 online Help Guide helps explain every feature.
- I prefer half-pressing the shutter button to lock the exposure, except when the AEL button toggle locks exposure first, in which case the shutter button is freed to half-press-lock just the autofocus:
- MENU > Camera Settings Tab 1 > List #8 > AEL w/ shutter > [On]
- Set the AEL button (Auto Exposure Lock) to behave as AEL Toggle. Otherwise locking the exposure will require our thumb to be awkwardly stuck holding down the AEL button until the shutter button is fully pressed. An asterisk * on the LCD or EVF indicates when AE is locked.
- MENU > Tab 2 > List #9 > Custom Key(Shoot.) > page 2 > AEL Button > [AEL toggle]
- For static landscapes, I prefer Focus Mode dial = DMF or S. My typical shooting habit is:
- First press AEL button as Toggle to grab a test exposure of the subject’s midtone, or on an edge halfway between dark and bright.
- Then half press and hold to lock focus on a high-contrast edge grabbed from the subject.
- Keep holding the half press and recompose to your desired framing. Then fully click the shutter release to capture the image.
- Correct the exposure with AEL on a brighter or darker area on subsequent shots as needed. Delete unneeded extras in the field.
- For subjects in motion, you can dial the Focus Mode (online guide) to A (Automatic AF, new in RX10M4) or C (Continuous AF).
- Setting A invokes Single or Continuous according to the movement of the subject: when the shutter button is pressed halfway down, focus locks if the subject is motionless, or continues to focus if the subject is moving.
- If Drive Mode is set to Continuous Shooting, then Continuous AF is used from the second shot onward.
- The constant hunting of C (Continuous Auto Focus) can be problematic on any camera, so I almost always use DMF or S.
- Know that the default Focus Area = Wide, using automatic AF points over the maximum area.
- For landscapes and non-action subjects, I prefer the reliable accuracy of Focus Area =Expand Flexible Spot. If focus is locked onto a moving subject, take the shot as soon as possible, or half press again to refocus (or use Focus Mode C or A).
- Sony names their touchscreen usage as “Touch Panel” when you view the LCD screen and “Touch Pad” when your eye is looking into the Electronic Viewfinder (EVF). (By default, when you look into the Electronic Viewfinder, the eye sensor automatically toggles the screen off and turns on the EVF.)
- You can override the default Focus Area = Wide with a specific AF point pressed with your right thumb on the “Touch Pad” (when eye is to viewfinder) or “Touch Panel“. To cancel a touched AF point, press the CENTER button, to return to automatic Wide. Only when you half press and hold down the shutter button will focus be attempted and locked. Adjust touch settings as follows:
- MENU > Tab 5 > List#2 > Touch Operation > [Touch Panel+Pad].
- If inadvertent touches get annoying, you can a) disable all touch operations with [Off] (preferred by Tom!), or b) restrict touches to [Touch Panel Only], or c) restrict touches to [Touch Pad Only]. Whenever Touch Panel or Pad is active, my inadvertent nose or finger press inevitably redirects the focus point to the wrong part of the frame without my knowledge! Therefore, I prefer to disable ALL touch operations and simply grab focus from a center spot using a half-press of the shutter button, then reframe to capture the image.
- Photographers who primarily shoot active subjects may find the touchscreen useful. I suggest the following options: MENU > Tab 5 > List#3 > Touch Pad Settings > [Operation in V Orientation=ON, Touch Pos. Mode=Relative Position, Operation Area = Right 1/2]
- In Playback mode, to examine picture sharpness (magnified by 5.3 times), flip the zoom tele lever once, then back out slowly with wide zoom lever, or fully back with CENTER button. Or double tap on Touch Panel to zoom in or out.
Secret settings for Sony RX10M4 / RX10 IV
- Yay, the MENUs are reorganized in RX10 IV, still deep but easier to use than version III.
- Sharpest apertures: RX10 IV and III are sharpest when shot at f/4 aperture through the first two thirds of their 25x zoom range from 24-400mm; then f/5.6 is sharpest at 500-600mm equivalent. These optimal f-stops give you the best balance between diffraction (through smallest apertures) versus chromatic aberrations (possible in all cameras at brightest openings; luckily hardly noticeable in RX10 III and IV due to automatic in-camera corrections before writing JPEG and raw files to the memory card).

Sony RX10M4 & M3 can create a special soft-focus starburst effect at aperture f/16. Photo: Eagle Cap Wilderness (read Tom’s article), Oregon.
- Starburst: Stopping down to f/16 aperture, RX10III creates a wonderful starburst effect emanating from intense pinpoints of light such as the sun or light bulbs. But as on most cameras, f/16 SERIOUSLY SOFTENS FOCUS (seen at 100% pixel view). Diffraction through the tiny f/16 hole cuts resolution in half compared to f/5.6 or brighter apertures. At all apertures brighter than f/16, down to f/2.4-4, rounded blades smooth the opening for more attractive bokeh (the appearance of the out-of-focus areas), and the starburst is NOT created. Using Adobe Lightroom Classic, I like to stitch multi-image panoramas where the sun shot(s) have an f/16 starburst, and the remaining shots use sharper f/4 to f/5.6 settings. Alternative: For sharper starburst images at f/4 to f/5.6, use a starburst filter (screw-on or hand-held square glass) instead of suffering the detrimental effects of f/16, unless your artistic intent is soft-focus.
- Fill flash synchronization down to 1/2000th of a second works exceptionally well for back-lit portraits in harsh sunshine. Most other cameras only synchronize as fast as 1/200th second.
- Transferring files from camera to computer is fastest using a memory card reader. Next fastest is connection by wire. I don’t recommend transfer via Wi-Fi, which may be clumsier, slower, and less reliable. To transfer image files from RX10 camera to your smartphone, install the Sony Imaging Edge Mobile app on your phone: https://imagingedge.sony.net/en-us/ie-mobile.html. The same app can use Bluetooth to send your smartphone’s geographic GPS coordinates to the camera in order to Geo tag images as they are shot. This camera app automatically connects within three seconds of turning the camera on and seems to work well.
- Assign the following to the Fn button for quick access: ISO Auto Min SS = minimum shutter speed at a given ISO = STD (standard), SLOW, SLOWER, FAST, FASTER. I like the SLOW setting to hand-hold shots which can blur moving water in relatively dim light.
- Turn on Face Detection and assign Eye AF to a button, for instant focus on human faces and eyes throughout the zoom range, great for portraits, action & sports.
- MENU > Tab 1 > List #14 > Smile/Face Detec. = [ON]
- MENU > Tab 2 > List #9 > Custom Key(Shoot.) > Custom Button 3 (Trash Can icon) > [Eye AF].
- Hold down the assigned Eye AF button, and a detection frame displays over the eyes when they’re focused. If the focus mode is set to Single-shot AF, the frame will disappear after a second. Continue holding down the Eye AF button while fully pressing the shutter release button. Not supported for focus mode = Manual.
- Turn OFF the Pre-AF option, for more reliable half-press focus-locking and quicker autofocus in the telephoto range, especially 400-600mm equivalent.
- Instead of hunting through menus, put favorite settings on the Fn button as follows: MENU > Tab 2 > List #9 > [Function Menu Set].
- I inserted: Drive Mode, Flash Mode, Flash Compensation, Focus Area, ISO, Metering Mode, Smile/Face Detection, SteadyShot for video, HFR Frame Rate, Peaking Level, ISO AUTO minimum Shutter Speed, Zebra.
- In shooting mode, set PEAK = MID (handily indicates area of sharpest focus).
- Set Zebra = [100+] for raw files (highlight overexposure alert). For shooting JPEG files, for Caucasian skin tones, consider Zebra = [70]
- But some important features buried in Menus are sadly not allowed on the Fn button. Workaround: use the MENU > Tab 6 > STAR menu (My Menu1) List #2/2 > [Add Item] for quick access! I recommend adding the following, to be more easily remembered on the STAR menu (My Menu1) List #1/2:
- Face/Eye AF Set: in Firmware upgrade version 2.00 (described further above), to make Animal Eye AF work with Half Press of the shutter button, you must toggle: MENU1 > Page 6 > Face/Eye AF Set > Subject Detection > set to [Animal], or set to [Human] (default).
- Panorama: Size (only active when Mode Dial is set to Panorama)
- Panorama: Direction (only active when Mode Dial is set to Panorama; for setting vertical or horizontal sweeps to make the panorama)
- [Movie symbol] Exposure Mode (only active when Mode Dial is set to Movie): allows setting Manual exposure mode for movies (see important Video Tips below).
- Use the quick Memory Recall (MR on mode dial, initially set within a confusing menu) to quickly set a whole palette of settings.
- Affix painters’ tape to the following set-and-forget switches or dials, per personal preference. Otherwise, if you frequently take the camera in and out of a carrying bag (such as my Lowe chest-mounted for hiking), dials frequently get bumped to unexpected settings, causing confusion. Painters’ tape removes cleanly with no residue and protects the camera’s finish.
- Exposure Compensation dial taped at zero. I prefer AEL Toggle button, which handily resets when camera is turned off; whereas the Compensation dial stays set, easily forgotten yet biasing every future exposure.
- Viewfinder diopter-adjustment dial taped for your vision.
- Focus Mode dial taped at DMF setting lets the front lens ring make fine manual focus adjustments with a magnified view after locking AF with half press of shutter release button (crucial for macro and telephoto).
- DMF is like S (Single-shot AF) plus magnification.
- If half-press AF lock is difficult to achieve (such as for a low-contrast telephoto subject), painters’ tape can be lifted and Focus Mode dial reset to MF (Manual Focus).
- For subjects in motion, use C (Continuous AF).
- Or more handily, A (Automatic AF, new in RX10M4) invokes S or C according to the movement of the subject: when the shutter button is pressed halfway down, focus locks if the subject is motionless, or Continues to focus if the subject is in motion.
- If Drive Mode = Continuous Shooting, then Continuous AF is used from the second shot onward.
- Focus Range Limiter switch taped at “FULL” allows shooting macro close focus at telephoto. (The other setting “∞-3m” is for reducing “focus hunting” time if shooting action subjects further than 3 meters away when zoomed between 150-600mm.)
- The much-used and inadvertently-bump-able MODE DIAL should not be taped. Instead, turning ON the Mode Dial Guide helpfully reminds me of the current setting (AUTO, PASM, MR, MOVIE, HFR, PANORAMA or SCN).
- MENU > Settings Tab 5 > List #2 / Setup2 > [Mode Dial Guide=ON].
- Be sure to [Disable] the Release w/o Card setting in MENU > Tab 2 > List #5 of 10. The “Release Without Card” default is ON for most cameras, in order to allow customers to freely test cameras on sales floors without a memory card inserted; but forgetting to replace a removed card sadly allows you to shoot without recording any images! Luckily, RX10M4 continuously flashes a bright orange warning message, “NO CARD”.
- Know that every time you half-press the shutter button, a harmless “FULL” message in a white box briefly displays on LCD or viewfinder, to indicate Focus Range Limiter status (or if set at “∞-3m”, then“LIMIT” displays if zoomed between 150-600mm, or “FULL” displays between 24-149mm equivalent).
Video tips for Sony RX10M4 / RX10 IV:
- The MOVIE button marked with a red dot can record with the current video settings no matter where the Mode Dial is set.
- Some video Settings can only be changed when the top Mode Dial is set to Movie mode (icon shaped like a film frame with spindle perforations).
- Some videos can be less distracting with a constant manual exposure as you pan across subjects of varying brightness. You can set the following secret P, A, S and M exposure modes, when Top Mode Dial = Movie mode:
- use MENU > Tab 2 > List #1 > “Exposure Mode” > press Center button, then scroll through PASM video options. To find it quicker, add movie “Exposure Mode” to My Menu1 (the sixth menu tab, marked with * asterisk symbol).
- To get a constant exposure during a video, use video M (Manual) mode: set ISO 100 (or as desired to a constant ISO number, but not AUTO ISO), set Aperture with ring on lens, and set Shutter Speed with either of the back two dials.
- To control subject-motion blur, set slow S (Shutter Speed) for more blur (as slow as the inverse of the frame rate in frames per second, fps).
- A Shutter Speed about twice as fast as the frame rate makes video look “normal”.
- Set a faster Shutter Speed (more than twice the frame rate) for a choppier, more jittery video, like in the film “Gladiator”.
- Play with the amazing High Frame Rate (HFR) video mode, shot in XAVC S 1080p HD format. For example, slow down action by 8 times at 480p (shooting frame rate) at 60p50M (frame rate of movie playback). I like setting Shoot Time Priority; and REC Timing=End Trigger, which records the 4 seconds BEFORE you pressed the Record Button! Limitations: only 4 seconds of real time are recorded (with 10-20 second delay writing to card); minimum ISO is 800; you must lock focus and exposure before recording; and HFR requires fast SD Memory Card Speed Class 10 or UHS Speed Class 1. (Previous RX10M3 records only 2 seconds of real time.)
- Assign a dedicated button to Focus Magnifier for use in Videos (else none is available). Tips: Focus is faster at brightest apertures (lowest f-number).
- For high contrast scenes, to better preserve details in shadows and highlights simultaneously, as for later tonal editing of wildlife videos, set Picture Profile (in MENU > Tab 1 > List #10).
- PP3 standard for HD television, not intended for tonal editing. Its natural color tone uses the [ITU709] gamma.
- PP5 for Cine1 gamma for later tonal editing, or
- PP6 for Cine2 gamma to preserve even more highlights for later tonal editing, or
- PP7 for S-Log2 gamma (which requires even more editing than PP6 to compensate for the flat, dull appearance).
- PP8 for S-Log3 gamma and the S-Gamut3.Cine under Color Mode. New in RX10M4.
- PP9 for S-Log3 gamma and the S-Gamut3 under Color Mode. New in RX10M4.
- Warning: the above Picture Profile that you set for video is remembered when the camera is turned off, and will also affect both JPEG and raw still images (but any custom settings for black level, black gamma, knee and color depth won’t affect raw).
- Picture Profile, Gamma Display Assistant, Peaking Level, and other items buried in the menus can be assigned to “Custom Key (Shoot.)” and/or to the quick Fn button (using MENU > Tab 2 > item 9 > “Function Menu Set“).
- Tip: In the USA, avoid the International, gray-market, or “direct import,” or “no manufacturer warranty” version of a Sony camera, since we require the USA Warrantee camera which defaults to NTSC format video. Only buy a Sony camera in a country having your native NTSC or PAL video format, or else every time you turn on the camera, you’ll forever be required to press any button to dismiss an annoying video notification message which fills the LCD, temporarily blocking camera use: “Running on NTSC“ — on any PAL-native RX10M3 or RX10M4 camera when set to nonnative NTSC. This happened to me twice: once with a camera bought in the UK and again with an unlabeled International Version sold by Tristate Camera in New York.
- RX10M4 lacks an electronic ND filter (Neutral Density), which is especially important for video in bright light, at bright apertures for shallower depth of field. Workaround: simply attach a glass ND filter to the 72mm threads on the front of the lens when needed, the old-fashioned way. Or try Panasonic FZ2500 with built-in ND filter.
RX10M4 negatives:
- Touch Panel/Pad doesn’t support menus, Playback, or Text.
- Cannot zoom while shooting a burst of frames in Drive Mode=Continuous.
- In M/Manual mode, you must turn off Auto ISO every time, set ISO manually, then set back to Auto ISO when switching back to P, A or S mode. I prefer Manual mode to always default to manual ISO. It forces Manual mode’s ISO to that of the other PAS settings, and vice versa.
- Avoid rain splatters: Despite Sony’s claim of “dust and moisture-resistant” body, DON’T EXPOSE YOUR RX10M4 or RX10M3 CAMERA TO RAIN (even if immediately wiped off), as wind-driven droplets killed my RX10 III. Yes, its weather sealing successfully kept dust and condensation out of the lens throughout my 16 months of use. But then one fateful rainstorm disabled the camera by shorting-out the focus and LCD, sadly outside of its 1-year Sony Warranty. Still, the lens interior remained pristinely clean and moisture-free. But rather than risking an estimated $656 repair, whose 90-day guarantee is voided by “liquid damage”, I recycled the camera. Buying a new RX10 III allowed completion of my UK photo shoot. Back in the USA, I sold the UK camera and I upgraded to a US-model RX10 IV.
World’s top travel cameras ranked by Tom
RX10M4 is first in my ranking of top travel cameras (priced at Amazon on December 3, 2023):
- $1700, 39 oz: $1700, 39 oz: Sony Cyber-shot DSC-RX10 IV / RX10M4 camera (Nov 2017, 25x zoom 24-600mm equivalent f/2.4-4) is the best of the bunch. This all-in-one tool overpowers all rival superzoom cameras with 1″-Type sensors. The 20-megapixel RX10M4 and previous RX10M3 both beat 10x to 19x lenses on rival 24-megapixel APS-C DSLR cameras. I no longer need to carry a pocket camera for improving close-focus shots, as RX10 already has a 1”-Type sensor. With deeper depth of field than APS-C or larger-sensor cameras for a given f-stop, it enhances details from close flower shots to distant bird feathers at 600mm equivalent telephoto. Both versions IV and III weigh 39 ounces (including battery & card), plus adding 4 oz for strap, lens filter, cap & hood makes 43 oz.
- $1400, 39 oz: Sony RX10 III (May 2016, 39 oz, 25x zoom 24-600mm f/2.4-4, no touchscreen): autofocus of version III significantly lags compared to IV, especially at 400-600mm .
- $900, 33 oz: Panasonic FZ2500 (December 2016, 33 oz, 20x zoom 24-480mm equivalent f/2.8–4.5): costs 25% less, adds a fully articulated LCD with touchscreen, increases viewfinder magnification (EVF 0.74x versus 0.7x), autofocuses faster, has better menus and improves video specs (ND filter, Cine/UHD 4K), in comparison to Sony RX10 III. But FZ2500’s lens collects a half stop less light, slightly lowering image quality; its telephoto doesn’t reach long enough for birders; and its CIPA battery life of 350 shots is shorter than RX10III’s 420 shots. (FZ2500 is FZ2000 in some markets.)
- $830, 11 oz: Pocketable: Sony Cyber-shot DSC-RX100 VI (2018, 11 oz, 8x zoom 24–200mm equivalent f/2.8-4.5, RX100M6): rivals the image quality of RX10M4 through 200mm equivalent, and at 30% of the weight. Avoid dropping its slippery body by adding Sony AG-R2 attachment grip. Fit into Tamrac Digital 1 Photo Bag with extra Wasabi Power NPBX1 batteries. Avoid LCD scratches with QIBOX Premium GLASS Protector to preserve resale. Exceptionally high quality from a miniature body ranks it above my former DSLR cameras and cameras below.
- $850, 29 oz: Panasonic FZ1000 version II (2019, 29 oz, but out of production 2025+), with fast-focusing 16x zoom lens 25-400mm equivalent, bright f/2.8-4 aperture, 20mp, 1″-Type BSI sensor, rivals the zoom quality of APS-C-sensor and DSLR systems of this weight. Adds fully-articulated LCD and the autofocus for action & sports is a bit faster than RX10 III (but slower than RX10 IV).
- $600, 11 oz: Pocketable: Panasonic ZS100 (price at Amazon) (2016, 11 oz, 10x zoom 25-250mm equivalent f/2.8-5.9): Read my ZS100 review. ZS100 introduced the first pocketable 10x zoom on a 1-inch-Type sensor, capturing close macro at more zoom settings and enormously extending optical telephoto reach beyond my 3x-zoom Sony RX100 (read my 2012-15 review). Anywhere from 3x-10x on Panasonic ZS100 beats digital cropping of rival Sony RX100 (which stops at 70mm equivalent in versions III and IV).
- 32 oz with 19x zoom: Good value DSLR with optical viewfinder (if you like that kind of thing) using a legacy mirror box:
- Nikon D3500 (2018, 13 oz body, ~$500, 24mp APS-C sensor/DX format, CIPA battery life 1550 shots) with travel lens:
- Tamron 16-300mm f/3.5-6.3 Di II VC PZD MACRO lens
(2014, 19 oz, ~$630, 19x zoom 24-450mm equivalent, 3 x 3.9″) equals Nikon’s kit-lens quality. But Sony RX10 IV and III are significantly sharper, especially at ≥90mm equivalent. [Avoid the Tamron 18-400 25-oz lens, which is too soft beyond 50-100mm, and its Vibration Control (VC) only helps by up to 2.5 stops slower shutter speed.]
- Upgrade: Nikon D5600 (2016, 16.4 oz body, 24mp) adds fully articulated (flip out) LCD touchscreen.
- 11.4 oz Pocketable: Panasonic Lumix DMC-ZS70 (2017, 11.4 oz, 30x zoom 24–720mm equivalent f/3.3–6.4, 20mp, EVF).
- or older ZS60
- or older ZS60
See my latest camera ratings on PhotoSeek BUY CAMERAS page.
Sony RX10M4 and RX10M3 beat the following midsize rivals for versatile lightweight travel:
- APS-C flagship Sony A6500 (2016, 16 oz body) or earlier Sony Alpha A6300 (2016, 14 oz body), plus mounting a SEL18200 11x zoom lens (27-300mm equivalent f/3.5-6.3, 19 oz, $900), totals 35 oz or 33 oz respectively.
- A6500/A6300’s interchangeable-lens capability is made redundant by RX10’s sharp and bright 25x zoom (which more than doubles my former zoom range while improving image quality).
- You must inconveniently interchange a much heavier, pricier set of lenses on APS-C cameras to rival the quality of RX10 III’s sharp 25x F4 zoom.
- This APS-C flagship is at best 5% sharper than RX10M4 when using the wider end of a premium 4x zoom lens, but no better in dim light. I would rather have an all-in-one 25x zoom which astoundingly extends sharp f/4 telephoto reach to 600mm equivalent.
- To my delight, RX10’s faster, larger-diameter lens (72mm filter size) plus backside illumination (BSI) sensor technology together magically compensate for the sensor size difference.
- The professionally-sharp, bright 25x zoom of RX10 III resoundingly beats the resolution of my previous favorite Sony 11x zoom lens SEL18200 on flagship APS-C Sony A6300 anywhere above 90mm+ equivalent telephoto, even as high as ISO 6400. At wider angles, 27-80mm equivalent, both capture similar quality in bright outdoor light. Advantageously, RX10 stretches to a wide view of 24mm equivalent. In dim/indoor light, A6300’s larger sensor can sometimes resolve more detail than RX10III, but not consistently in my real world comparisons using SEL18200 and SEL1670Z lenses.
- Canon PowerShot G3 X camera (2015, 26 oz, 25x zoom, 20mp) has 24-600mm equivalent f/2.8-5.6 lens (which is neither as bright nor as sharp as Sony RX10 III). The G3 X buys you lighter travel weight, but you must separately add a pricey $240 viewfinder. Also its older, poorer 1″ sensor is a stop or two worse at ISO 800+ in terms of noise compared to FZ1000 or RX10. Panasonic FZ1000 is a better value than G3X.
Sony RX10M4’s 1″-type EXMOR RS sensor has 20 million photosites, for creating 20-megapixel images. The sensor’s pixel pitch = 2.4 µm (micrometers). “Pixel pitch” for sensors (actually “photosite pitch”) is defined as the distance from center to center between two of the photosites. The actual size of each light-sensing photosite is slightly smaller than the pixel pitch. The pitch may only be useful for comparison if you also know the physical sensor size and number of megapixels. However, a better measure of actual photo quality is to compare cameras in the field side by side using comparable settings. [In comparison, Apple iPhone 13 Pro Max has 1.9 µm pitch on its standard 26mm equivalent f/1.5 12MP camera with 1/1.65″ sensor, up from 1.4 & 1.7 µm on iPhone 12 Pro & Pro Max respectively.]
How do RX10M4 and RX10M3 compare to full-frame cameras?
As of 2023, the world’s best travel system is the Sony A7CR (2023, 18.2 oz, price at Amazon) 60-megapixel full-frame-sensor camera mounted with its sharpest travel lens, the 8x optical zoom Tamron 25-200mm F2.8-5.6 Di III VXD G2 for Sony E-mount (2025, 20.3 oz) — 38.5 ounces total including body, lens, battery, and memory card (or 41 ounces when you add the strap, LCD cover, lens filter, lens cap, and hood — 2 ounces lighter than the RX10M4).
In July 2025, Tom compared the Tamron 28-200mm F2.8-5.6 lens mounted on the 60 MP A7CR camera with his 20 MP Sony RX10M4 with 24-600mm equivalent lens F2.4-4 (an all-in-one camera weighing 2 ounces heavier and having a 1″-Type sensor which is 2.7 times smaller diagonally). My testing shows the A7CR system is sharper than Sony RX10M4 from 28mm to 450mm equivalent (a 16x zoom range). The two systems become equally sharp where Tamron images shot at 200mm are digitally cropped to about 460mm equivalent on the 20-megapixel RX10M4. Further cropping this A7CR system to 600mm equivalent resembles 10 MP on the RX10M4 — sufficient for publication. Tamron’s 28-200mm is about equally sharp as Tamron’s 8x zoom 25-200mm lens, new in 2025.
In its favor, the RX10M4
■ is sharper from 500-600mm equivalent for wildlife and bird magnification (optimally shot sharpest at f/5.6),
■ covers wider angles of view from 24-27mm equivalent,
■ costs less than half as much (though Sony’s discontinuation of RX10M4 production in March 2025 means future purchases will be used or refurbished models),
■ and includes a built-in flash and a sharper LCD (although with less articulation, just swiveling).
In historical perspective, the Sony RX10M4 makes prints far bigger and sharper than my full-frame 35mm film cameras used 1978-2004. Compared to modern full-frame digital sensors, RX10M4’s 1-inch-Type sensor has a “crop factor” measuring 2.727 times smaller diagonally.
Multiply the f-stops of RX10M4 and RX10M3 by 2.727 to get the full-frame equivalent f-stops (in terms of physical hole diameter of the relative aperture):
f/2.4 * 2.73 = f/6.5 equivalent
f/4 * 2.73 = f/11 equivalent
f/5.6 * 2.73 = f/15.3 equivalent
f/16 * 2.73 = f/43.7 equivalent
Although you can get an interesting starburst effect from the sun or pinpoints of light when shot at f/16 on RX10 IV and III, apertures f/8—f/16 should generally be avoided on 1-inch-sensor cameras due to fuzzy diffraction across the entire image frame, worst at f/16, cutting resolution in half.
Sony RX10M4 is the best all-in-one for me, biologist. Be aware that the recommended Sony A7CR for this year seem to be not water resistant, a must have for field work. After 5 years of good service, water manage to alter some buttons but it cost 400$ CAN to get repair (new top) and I am still good since then.